Userguide for the Debian Trixie PineNote OS image#
Introduction#
Hi there, nice of you to install this Debian image on your PineNote!
Before you begin, please bear in mind that the PineNote, and this image, is aimed at experienced users and developers and many things need manual tweaking or do not just work yet. However, many things also work, and you can take control of quite a lot of things. If you have not done this yet, we strongly recommend to at least skim this document before proceeding to use your PineNote.
If you want to improve this text, merge requests are very very much appreciated!
Where to get help#
Remember, software for the PineNote is created by the community, for the community!
Probably the best and fastest way to get help is to join the PineNote chat via Matrix, IRC or Discord. Please refer to the wiki page for more information on chats and forums: Pine64 Wiki.
Getting started#
-
User/Password: You are logged in as user "user" with password "1234". sudo is activated. We suggest to set a root password:
sudo su - root passwd -
The Documents/ directory contains one sample .pdf and one .epub file. Try opening them and start reading!
-
You may want (should!) to reconfigure your locales:
sudo dpkg-reconfigure locales
GNOME localisation can be changed in the settings.
-
The status bar at the top contains the refresh button and the PineNote-Helper GNOME extension, which helps you to control some aspects of the eink display. Both of these items will become important for an effective use of the PineNote in a GNOME environment.
-
(advanced users) Your PineNote comes partitioned with two Operating System partitions (os1 and os2, each ca. 15 GB in size). The default install resides on os1, leaving os2 for experiments, such as other distributions images, etc. If you plan on modifying this installation heavily, a second install to os2 could help in recovering from serious errors. More information on installing a Debian image to os2 can be found here.
How do I...#
- Read a book (epub)/pdf:
- Koreader is already installed and should be registered for corresponding file types
- Take notes: Xournalpp is installed on the PineNote by default. See this meta-issue on github for more information and other programs to test: https://github.com/PNDeb/pinenote-debian-image/issues/81
- Surf the internet using Firefox
- Use the PineNote as an external screen?:
- (untested) The Weylus project could be of help: https://github.com/H-M-H/Weylus
- Use an external monitor with the PineNote?: The PineNote is not wired to
provide external display support via usb-c (this is called alternate
mode. Therefore, if you
want to use the PineNote as an external display, you will need to use other
means.
- (untested) The Weylus project could be of help: https://github.com/H-M-H/Weylus
- (untested) Provided that you are running a newer GNOME installation on your computer, you could try to use GNOME remote connections and virtual monitors (https://ubuntuhandbook.org/index.php/2023/07/share-extended-screen-gnome/)
The GNOME extension for the PineNote#
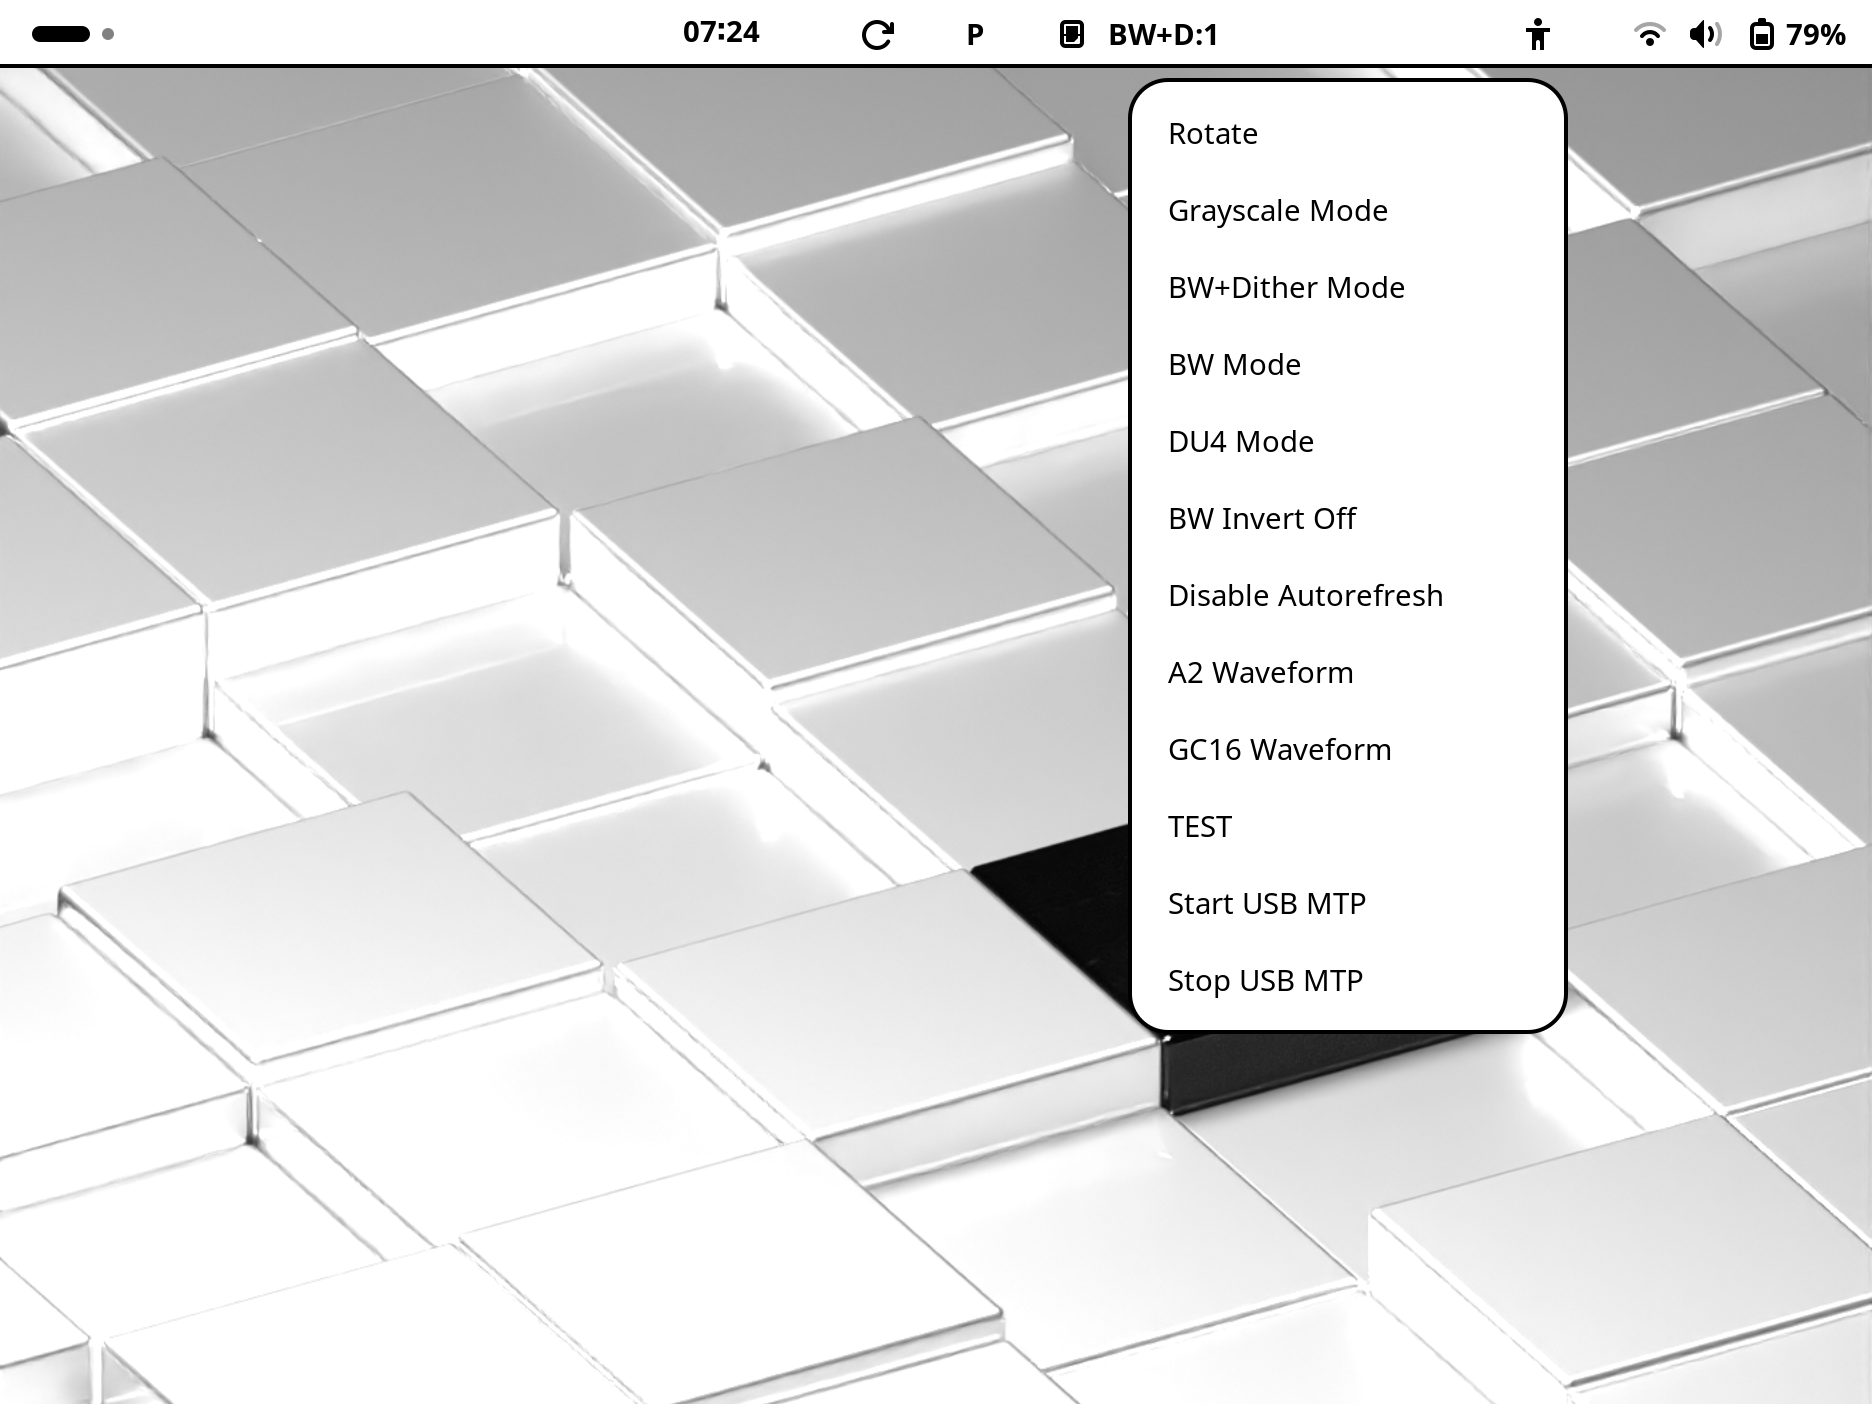
The PN comes with an extension installed that provides quick access to certain PineNote-related functionality. Four items are added to the GNOME interface:
- a "global refresh" button right next the system clock (circular arrow)
- a P/Q performance/quality mode switcher and indicator (to the right of the refresh button)
- A menu button/indicator, to the right of the mode switcher.
- An additional backlight slider is also added to the quicksettings menu, opened by clicking/touching the battery symbol in the upper right of the panel
Updates#
Apart from a number of tweaks aimed at producing an improved user experience on
the PineNote, and a few patched packages, you are running a Debian Trixie
Operating System which can be maintained as every other system. Use apt or
aptitude to manage you packages.
- (stock firmware only - image generated after 29. Dec 2024 do NOT install
gnome-software anymore!)
gnome-softwareis also installed and should prompt you within GNOME in regular intervals if software updates are available.
A PineNote package repository is configured by default in this installation. For manual configuration of the repository, please refer to this part of the image Readme.
Drawing Performance is too slow#
Multiple things come into play here, and debugging those issues usually is complicated:
- Please note the EPD (eink) panel is highly temperature sensitive. Colder temperatures require longer waveforms to excitate the ink particles in the panel, which there leads to slower refresh rates.
- Xournalpp: There is an older, slightly patched, Xournalpp available. For some people, drawing performance increased with that version, for others not. Note that sometimes the background is not properly refreshed in this version, requiring a small scrolling action to actually show the background.
- Make sure to cycle to Quality mode and then back to Performance mode in GNOME. This is done using the P/Q Symbols in the upper status bar. Just press the respective character once to change between modes. You want the P(erformance) mode for drawing.
- It was reported that the 6.3 kernel version installed on the PineNote provides faster drawing performance (the downside is that potentially in some scenarios you will observe visual artifacts due to some subtle internal queuing bugs)
See also this github issue for more information.
Switching the default boot partitions#
You need shell root access, either via ssh, or via the UART dongle
-
mount the uboot_env partition:
mount /uboot_env -
use the provided shell script to change the boot order:
cd /root
./uboot_change_bootmenu.sh
Documentation for apps/systems#
Wakeup-Sources#
The PineNote can be woken up from suspend from these sources:
- Cover opening
- Bluetooth
- Power cable plug-in/plug-out
- PWR Button
- Touch screen (not configured by default)
- (batch 1 from 2022): BLE Buttons on the pen
Sleep sources#
- PWR-Button-press
- Pen-Button-Press
BLE Pen (Buttons)#
Info
This is only relevant for the first batch of PineNotes, sold in 2022. The 2024 batch does not have BLE buttons in the pen!
The PineNote Pen interfaces with the PineNote using two interfaces:
- The stylus input is one using the touchscreen (cyttsp5 driver),
- on the other hand, the three buttons are controlled via a separate Bluetooth-Low-Energy-based connection.
A driver for the BLE-button interface was developed by smaeul (https://github.com/smaeul/linux/commits/rk356x-ebc-dev).
The hardware contains non-volatile storage for the MAC address - it could be that the pen just works. Otherwise, as root, connect manually:
echo 1 > /sys/bus/spi/devices/spi4.0/scan; # scanning takes ca. 12 seconds
                                         # press the buttons during scanning
# print MAC address pen
cat /sys/bus/spi/devices/spi4.0/scan
echo [MAC] > /sys/bus/spi/devices/spi4.0/pen_address
Afterwards, check that the pen is working by checking the pen attributes:
cat /sys/bus/spi/devices/spi4.0/pen_version
cat /sys/bus/spi/devices/spi4.0/pen_battery
EBC Kernel Driver#
The EBC subsystem controls the eink (or EPD) display and is one of components which require most tweaking for each user.
* ioctls

    * trigger global refresh
    * set offline-screen
    * [to implement] set standby screen mask & behavior
* misc:

    * discuss the waveform-switching issues in a general DE environment:
      recommend to always do a global refresh after switching waveforms,
      unless you know that your buffer is compatible
Usage#
All module parameters are controlled using the sysfs parameters in
/sys/module/rockchip_ebc/parameters
The module parameters can also be set on module load time, for example using the modprobe configuration file:
root@pinenote:~# cat /etc/modprobe.d/rockchip_ebc.conf
options rockchip_ebc direct_mode=0 auto_refresh=1 split_area_limit=0 panel_reflection=1
By default the parameters in /sys/module/rockchip_ebc/parameters need to be
writen to as root, but this can be easily changed via udev rules.
Debugging#
Newer versions of the kernel driver use the dynamic debug feature of the linux kernel.
As root, the following commands should get you going. Note that the line
numbers can change between kernel releases! Check the output of cat control |
grep rockchip_ebc
cd /sys/kernel/debug/dynamic_debug/
# lists all debug outputs available for the module
cat control |
grep rockchip_ebc
# now we can activate/disable individual debug statements
echo -n 'file drivers/gpu/drm/rockchip/rockchip_ebc.c line 1289 +p' > control
# list currently active (=p) debug statements
cat control | grep rockchip_ebc | grep " =p "
Overview of module/sysfs-parameters:#
- TODO
split_area_limitdenotes the number of splits that the driver is allowed to apply to individual clips. The idea is: when you submit two damage regions for drawing, and both regions overlap, and the first one already started, then it sometimes makes sense to split the second area into four smaller regions, from which three can already start drawing. This is really useful for writing applications where there is usually a little bit of overlap between subsequent drawing areas
In addition, two custom ioctls are currently implemented for the ebc driver:
- TODO
Black and White mode#
Activate with
echo 1 > /sys/module/rockchip_ebc/parameters/bw_mode
the threshold value can be set using:
echo 7 > /sys/module/rockchip_ebc/parameters/bw_threshold
7 is the default value, meaning that all pixel values lower than 7 will be cast to 0 (black) and all values larger than, or equal to, 7 will be cast to 15 (white).
Auto Refresh#
Enabling automatic global (full screen) refreshes:
echo 1 > /sys/module/rockchip_ebc/parameters/auto_refresh
Global refreshes are triggered based on the area drawing using partial refreshes, in units of total screen area.
echo 2 > /sys/module/rockchip_ebc/parameters/refresh_threshold
therefore will trigger a globlal refresh whenever 2 screen areas where drawn.
The threshold should be set according to the application used. For example, evince and xournalpp really like to redraw the screen very often, so a value of 20 suffices. Other require lower numbers.
The waveform to use for global refreshes can be set via
echo 4 > /sys/module/rockchip_ebc/parameters/refresh_waveform
A value of 4 is the default.
Waveforms#
-
the
default_waveformparameter controls which waveform is used. Based on information frominclude/drm/drm_epd_helper.h, the integer values are associated with the following waveforms:0: @DRM_EPD_WF_RESET: Used to initialize the panel, ends with white 1: @DRM_EPD_WF_A2: Fast transitions between black and white only 2: @DRM_EPD_WF_DU: Transitions 16-level grayscale to monochrome 3: @DRM_EPD_WF_DU4: Transitions 16-level grayscale to 4-level grayscale 4: @DRM_EPD_WF_GC16: High-quality but flashy 16-level grayscale 5: @DRM_EPD_WF_GCC16: Less flashy 16-level grayscale 6: @DRM_EPD_WF_GL16: Less flashy 16-level grayscale 7: @DRM_EPD_WF_GLR16: Less flashy 16-level grayscale, plus anti-ghosting 8: @DRM_EPD_WF_GLD16: Less flashy 16-level grayscale, plus anti-ghosting -
(side note): Based on information from
drivers/gpu/drm/drm_epd_helper.c, the PineNote uses eps lut form 0x19, which associates waveform types with the luts stored in the file as:.versions = { 0x19, 0x43, }, .format = DRM_EPD_LUT_5BIT_PACKED, .modes = { [DRM_EPD_WF_RESET] = 0, [DRM_EPD_WF_DU] = 1, [DRM_EPD_WF_DU4] = 7, [DRM_EPD_WF_GC16] = 2, [DRM_EPD_WF_GL16] = 3, [DRM_EPD_WF_GLR16] = 4, [DRM_EPD_WF_GLD16] = 5, [DRM_EPD_WF_A2] = 6, [DRM_EPD_WF_GCC16] = 4, },
For example, if you want to inspect/modify the A2 waveform, this corresponds
to the 7th waveform in the lut file (index 6), but is activated via
default_waveform by writing value 1.
Trimming the A2 waveform#
You can trim the A2 waveform for improved writing performance, with the downside that black sometimes is displayed in gray tones.
The supplied script is very slow and unoptimized and therefore not run automatically (run time on PineNote ca. 20 minutes).
Call these command in a root shell to trim the A2 waveform (note: this will reboot the PineNote once):
cd /root
# this command should take ca. 20 minutes !!!
time python3 parse_waveforms_and_modify.py
# save the original waveforms for later use
mv /lib/firmware/rockchip/ebc.wbf /lib/firmware/rockchip/ebc_orig.wbf
ln -s /lib/firmware/rockchip/ebc_modified.wbf /lib/firmware/rockchip/ebc.wbf
update-initramfs -u -k all
reboot
Xournalpp/Writing#
- Switch to "BW+Dither" mode when working in Xournalpp
- Kinetic scrolling needs to be disabled because GTK3's implementation interferes with some aspect of touch input handling, including touch cancel events
Bluetooth#
It was reported that, under certain conditions, it may be benefitial to disable offloading. E.g., WPA3 was reported to run that way.
# disabling offloading for the brcmfmac kernel module
options brcmfmac feature_disable=0x82000
Firmware Blobs#
To the best of our knowledge, the following non-open code is run as firmware on your PineNote:
- rk3566 RAM timings/TF-A
- Bluetooth/Wi-Fi firmware
- Touchscreen firmware
- Firmware on the second BLE chip, used to connect the Pen buttons of batch 1
Ask the PineNote chat for more information.
Advanced usage of the Debian system#
Using the GNOME environment with a non-default user#
If you want to use your PineNote with another user (the default is: user), then make sure to add the new user to the following groups:
dialout,sudo,audio,video,plugdev,users,bluetooth,render,input
This can be achieved, for example, using the following command (as root):
usermod -G dialout,sudo,audio,video,plugdev,users,bluetooth,render,input [USERNAME]
Using another partition for /home#
Depending on the method of installation, /home is located on the root
partition, which is quite small in size (check by analysing the output of the
mount command).
However, a bash script is
provided in /root/switch_home_to_other_partition.sh which can be used to
change the partition that is used for /home. The script can also transfer data
from the current /home to the new partition. Call as root.
Example to switch /home to /dev/mmcblk0p7:
cd /root
switch_home_to_other_partition.sh /dev/mmcblk0p7
Topics to cover here#
-
DBUS service
- control ebc driver
- [to implement] handle pen pairing/unpairing
-
The GNOME extension
- BLE Pen (Batch 1 from 2022 only)
- Resources
Troubleshooting#
Flashing problems#
- The PineNote is VERY picky about usb-c cables. It's best to use the supplied usb cable for flashing via rkdeveloptool. If flashes take very long or abort prematurely, try different cables.
My PN is stuck at the boot loader boot screen#
- If available, use the UART dongle to check if the PN boots, but for some reason did not initialize the screen. See The wiki page for more information on PineNote UART dongles.
My PN does only show boot text (and maybe the boot logo)#
![]()
- This does mean that the underlying linux operating system is booting, but there are issues with the graphical user interface.
- If available, use the UART dongle to check if the PN boots, but for some reason did not initialize the screen.
- Try removing lightdm and reconfigure gdm3 (you need to use the gdm3 login manager for successful login):
  sudo apt remove lightdm
  sudo dpkg-reconfigure gdm3
My PN does not show anything on boot#
- For various reasons, the PineNote can completely crash. This requires a hard reset, which is accomplished by holding the red power button on the top of the PN for ca. 13 seconds. Afterwards, you should be able to power on the PN by a short (1-2 second) press on the power button.
- If still nothing happens, you need an UART dongle to check if there is output on the serial port. The wiki page for more information on PineNote UART dongles.
- Get in contact in the chat - you may need to open up the PineNote and enter maskrom mode by shorting two test points. For more information, see (https://wiki.pine64.org/wiki/PineNote_Development/Flashing#Entering_Maskrom/Rockusb_mode).